Refrigerator Door Repair
Replace a door gasket on a refrigerator....

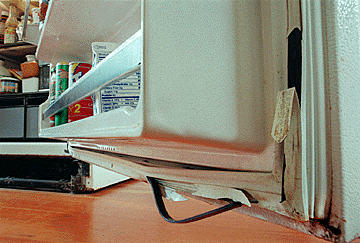
The first thing to do when changing a door gasket is to check and see if you have the proper part before taking the old gasket off. Hold the new gasket up to the fridge door to make sure the gasket is the same size as the old one. Next step is to remove the wrinkles in the gasket caused by folding for shipping. Instructions with the gaskets say to soak the gasket in hot water. Another way is to use a hair dryer to heat the gasket and remove the wrinkles. Be careful not to burn the gasket with the hair dryer. Almost all gaskets in use today are magnetic. I am placing instructions here for the most common one. They have strips of magnetized material inside the gasket material to adhere to the cabinet when the door is closed. Therefore there is sometimes no up or down on the gasket. Some fridge's have magnets on only 3 sides and the side without a magnet is the hinge side gasket. But to be safe, check this before installing. You will certainly want to check for this on older refrigerators that have magnetic door latches. Some of these have no magnets on the latch side of the gasket. There are about three different ways of attaching gaskets. All will be addressed on this page. Remove the food from the shelves on the door. Loosen the screws that hold the metal strips that keep gasket in place on the top half of the door. Back the screws out about 1/4 inch. The gasket has a lip on it that seats in a groove under the top part of the metal strip. Pull the old gasket off. Work the groove on back side of the new gasket under the cutout in the metal strips that holds it on the door liner. Straighten and get good install before tightening screws. Run screws back up against the metal holding strip snugly, not fully tight. Go to the bottom and do the bottom half. By doing the top half first and tightening, then doing the bottom half, you will minimize any warping of the door. If there is warping of the door, we have not yet fully tightened the screws. so you can realign the door easily and then tighten the screws. Check the alignment of the door and be sure the gasket is sealing properly before fully tightening the screws. If the door is warped, (see picture) simply warp it back to a sealing position, then tighten the screws. There are instances where the gasket is too tight on the hinge side, and you may have to shim the door hinges out from the cabinet to keep the gasket from scrubbing when closing. .also use a little petroleum jelly on the gasket on the hinge side will allow the gasket to "settle" better. The hinge side must slide along the cabinet edge while the other 3 sides just close up against the cabinet. The jelly will allow the gasket to rub smoothly and also prevent squeaking noises. Maintenance of the gasket is important also. It should be cleaned on a regular basis. Clean the gasket and the mating cabinet surface with warm soapy water, rinse clean and dry it good. Putting a little baby powder on the sides (except the hinge side because we put the jelly there) will prevent the gasket from sticking and tearing. The heaters in the refrigerator used to keep moisture from forming on the cabinet attracts airborne materials and make the gasket sealing surfaces sticky. The powder will help stop this. Probably 75% of the fridge's made a few years ago use this edge under the metal track....some American made fridge's use the U shaped metal strip and the gasket pushes into the metal strip, (see a picture) the screws that hold this metal strip do not have to be removed or loosened. A lot of fridge's also use the metal strips with out the edge. Some Maytag's and Woods come to mind. The screws go through the metal strip and the gasket as well. The screws have to be removed completely to replace the gasket.
Gasket sheet to assist you in replacing a common door gasket.
Freezer door pops open when I shut the fresh food door:
This happens because the refrigerators of today are air tight, the fresh food door pushes the air into the cabinet as it closes and the air has no place to go but up the air vent into the freezer and "pops" open the freezer door. First thing is make sure the freezer door is capable of closing properly and is not rubbing or catching anywhere. I sometimes add a washer or 2 to the center hinge under the freezer door so it doesn't rub anything. Put a little Vaseline ( or food grade silicone lubricant ) on the hinge side of the seal. I then raise the front of the refrigerator so that the front of the refrigerator is a little higher than the back of the refrigerator. Never level a fridge with a level. Once you have the door closing properly and front slightly higher than the back...let the fresh food door close from 90 degrees on it's own and the freezer door may "pop" open a little but will close again on it's own...and stay closed once all is set up properly. We see this more often now and have no trouble with the door staying open again after setting up the refrigerator properly.
Related Links


