


Reversing Frigidaire Top Freezer Refrigerator Door
Door Reversal Instructions....

Remove the toe Grille. On some models you have to snap off hinge at top of cabinet, on other models with the freezer door closed remove the two screws attaching the upper hinge to the cabinet. Lift the hinge up and off.
Be sure to save screws and hinge for reassembly later.
Open the freezer door enough to allow it to be lifted off the center hinge.
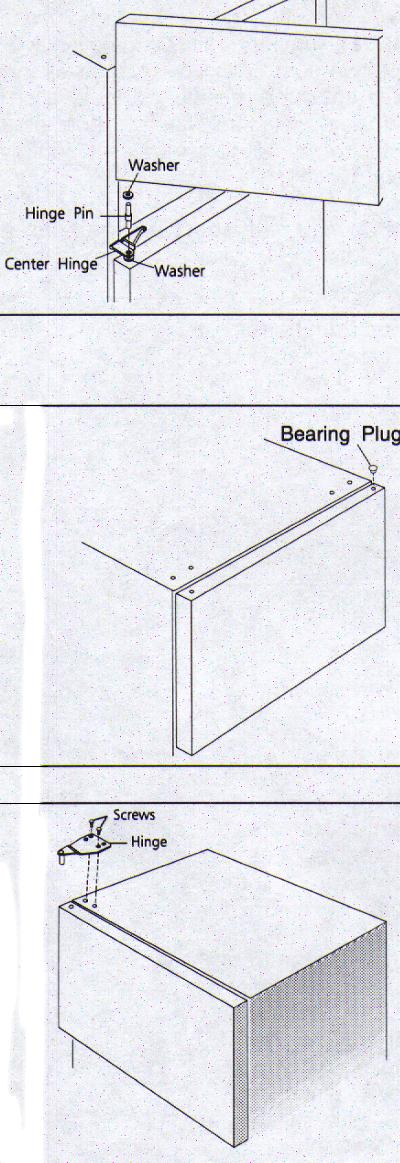
With the refrigerator door closed, remove center hinge pin. (Note the arrangement of the upper and lower washers (some models) on the hinge pin. The washers must be reassembled later in the same manner.) Open refrigerator door enough to allow door to be lifted off the lower hinge. Remove the two screws attaching the center hinge. the third outermost screw under the center hinge should be left in place. Reinstall screws in original holes.
Save hinge, pin, and washers for reassembly later.
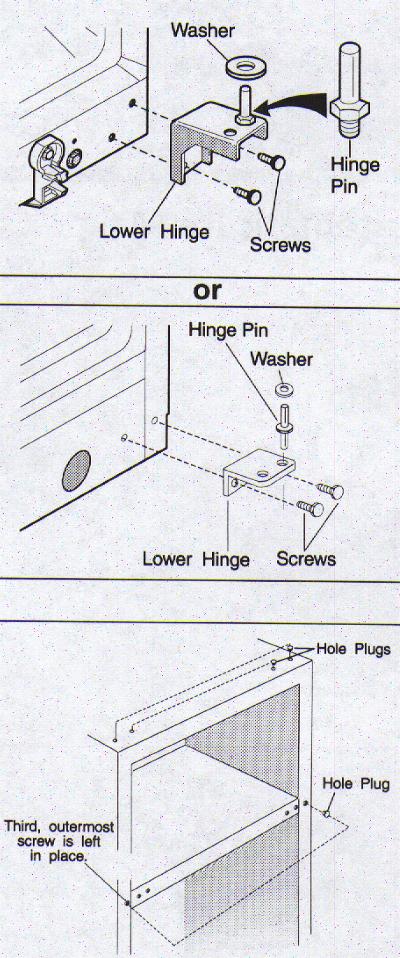
Remove hinge pin, hinge, and the two screws attaching the lower hinge.
Save the hinge, hinge pin washer and screws for reassembly later.
Carefully remove the hole plugs from the hinge holes in the center mullion and top of cabinet and reinstall in the opposite set of holes.
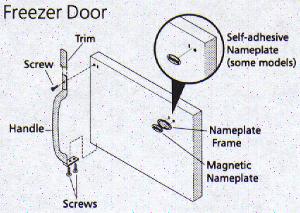
Freezer handle with magnetic nameplate, reverse the handles while the doors are off. remove the 2 screws attaching the handle to the bottom of the door. Remove the short trim piece be sliding the trim straight up and off of handle bracket. Remove the screw attaching the top of the handle to door, and reinstall on the other side, using the same holes as the nameplate. To move nameplate to other side, remove the magnetic nameplate from it's frame, turn frame upside down and install in old handle holes. Insert magnetic name plate into frame. Reattach handle to bottom of door. Slide the trim piece straight down onto handle bracket.
Freezer handle with self adhesive nameplate, reverse handles while the doors are off. Remove the 2 screws attaching the handle to the bottom of the freezer door. Remove the short trim piece by sliding the trim straight up and off ( some handles without the short trim piece, simply push the handle up and off it's keeper peg and transfer the plug and screw to the other side ) Remove the screw attaching the top of the handle to the door, and reinstall on the other side, using the holes found behind the self-adhesive nameplate. To move nameplate to the other side, peel off the nameplate and reapply over the old handle hole(s). Reattach handle to bottom of the door. Slide the trim piece straight down onto the handle bracket.
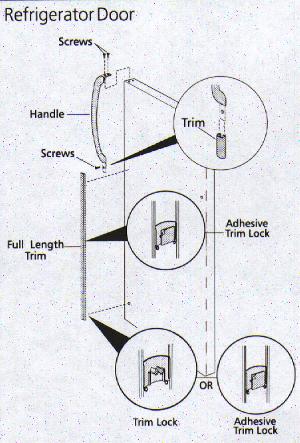
In some models, the refrigerator door has a full-length trim piece which continues from the bottom of the handle to the bottom of the door. The top of the trim attaches to the handle bracket. An adhesive "trim lock" is positioned about half-way down. The bottom of the trim is held in place by either an adhesive trim lock with two prongs inserted into a hole on the face of the door. Remove the trim by gently pulling the trim lock areas out and away from the door. When the trim is free from the door, slide the trim straight down and away from the handle bracket.
For models with short handle trim, remove by sliding the trim straight down and off of handle bracket.
To remove handles: remove three screws attaching the handle to the refrigerator door. Carefully remove hole plugs from corresponding holes on opposite side of doors and reattach handle.
To reattach trim: Slide both trim locks out of trim. Insert the new adhesive trim locks contained in your literature pack. NOTE: trim lock must be removed and installed by sliding up over the two donut shaped areas. Install trim to handle by sliding up over bottom of handle. Carefully align trim and press down at trim lock locations. Replace hole plug on opposite side. Use rubbing alcohol to remove any adhesive residue from old trim lock location(s).
For models with short handle trim, slide the trim straight up onto handle bracket.
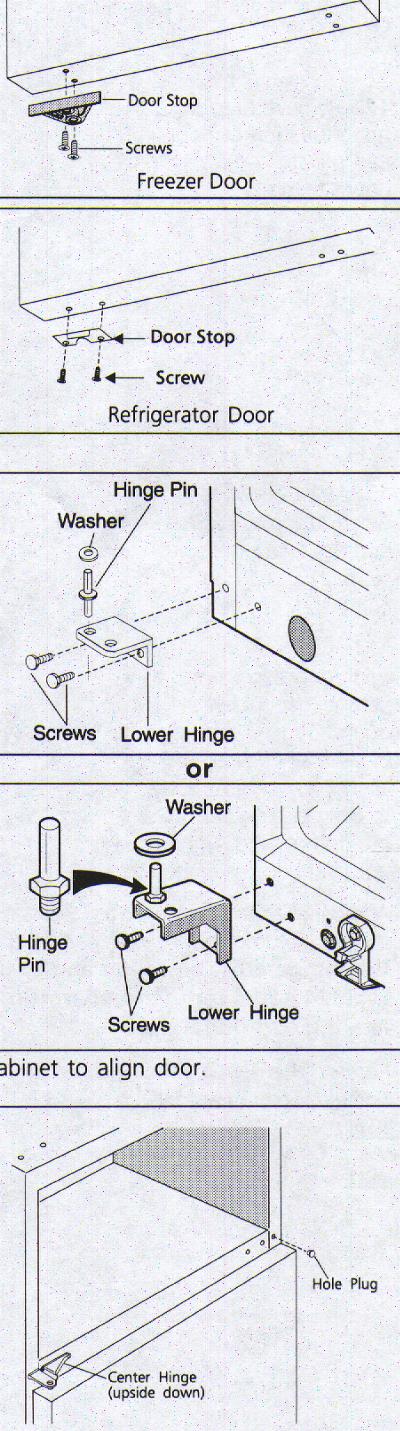
Remove door stop from bottom of freezer and refrigerator door and reinstall on opposite side.
If your refrigerator does not have a toe Grille, use a putty knife to remove the plastic plug (not shown) from front of base and reinstall in the opposite set of lower hinge holes. Assemble lower hinge to cabinet. Install hinge pin in opposite hinge hole from witch it was removed. Install the washer (some models) on the lower hinge pin and insert hinge screws, but do not tighten. Hinges will have to remain loose against cabinet to align door.
Turn center hinge upside down and secure to cabinet as shown, using the screws which are in the new holes. Install refrigerator door on lower hinge pin. Align door with edge of cabinet. Hold the door on front of cabinet.
Place original washer (some models) over hole in refrigerator door and line up hole in center hinge. Insert hinge pin through both holes. place washer (some models) on hinge pin, then position freezer door on center hinge.
Remove plug from upper bearing of door and reinstall on opposite side.
Assemble upper hinge to top of cabinet and door. use opposite set of holes. Do not completely tighten screws.
Align doors so there is a parallel gap between doors. Original shipping block may be used to align doors. Adjust doors to cabinet so gaskets seal but do not bind. tighten upper and lower hinge screws.
Return food, bottles, and condiments back into the inside of the doors.
![]()
Related Links
- Frigidaire Refrigerator Gaskets & Seals
- Frigidaire Refrigerator Defrost Thermostats, Sensors
- Frigidaire Refrigerator Defrost Timers, Adaptive Defrost Controls