


Reversing Amana Top Freezer Refrigerator Door
Remove and reverse refrigerator and freezer handles performing the following steps:
IMPORTANT- For plug removal requiring use of flat blade screwdriver or putty knife, blade of tool must be covered with masking tape to avoid damage to refrigerator finish. For plugs using a screwdriver- or nut driver- style head, use appropriate tool to avoid damage to plugs. Remove end caps from top (some models) and bottom of refrigerator handle with flat screwdriver blade wrapped in masking tape. Remove two screws from top of handle and screw from base of handle.
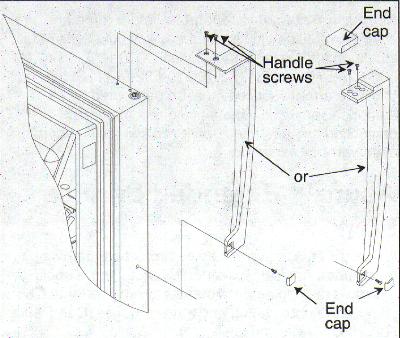
Models with automatically reversing log. Remove end cap from top of freezer handle using a screwdriver with the blade covered with masking tape (see illustration below). Remove one top and two bottom mounting screws.
Handles with removable logo on handle. Remove end caps from handles using a screwdriver with the blade covered in masking tape. Remove handle screws to remove freezer handle. Remove freezer handle cover by lifting end. Bend tabs behind nameplate up and remove nameplate. Rotate nameplate and cover.

Remove top hinge cover. Top hinge cover snaps off. Remove top hinge and shim using hex nut driver.
Lift freezer door off center hinge.
Lift door closure off center hinge pin. Remove center hinge pin with a 9/32" hex nut driver.
Remove refrigerator door by lifting off bottom hinge.
Remove center hinge bracket and shim using Phillips screwdriver.
Remove toe grille and bottom hinge cover. Both snap off.
Remove bottom hinge and shim using hex nut driver.

Reverse doors by performing the following steps: Replace bottom hinge and shim on opposite side of cabinet. Remove screws from center mullion. Place screws in holes left when center hinge bracket was removed. Rotate center hinge bracket 180� and install center hinge bracket on opposite side of cabinet with hinge screws. Reuse plastic hinge pin washers. Place refrigerator door on bottom hinge. Install center hinge pin in center hinge bracket. Place door closure on center hinge pin. Remove plugs from top of refrigerator cabinet. Replace plugs in holes left when top hinge was removed. Remove hinge hole cover from freezer door. Replace on opposite side of freezer door. Place freezer door on center hinge and door closure. Install top hinge and shims on opposite side of cabinet using hex nut driver. Snap hinge cover in place on hinge. Use a penny at top to space door �" (19mm) from cabinet. Make sure handle side of door is 1/8" (3mm) higher than hinge side of door before tightening top hinge screws.

Remove plugs from side of refrigerator and freezer doors.

Mount freezer handle on opposite side of the refrigerator door using the mounting screws previously removed. Snap cap(s) into place. Mount refrigerator handle on opposite side of freezer door using the mounting screws previously removed. Snap end cap(s) into place. Replace plugs in empty mounting holes on refrigerator doors. Level front of fridge slightly higher than the back of the refrigerator.
![]()
Related Links